Using a Keyword Tool

I don’t know much about keywords but I've been reading more about this. What I’ve noticed is that  the right keyword  helps my site get indexed by search engines. This is because search engines make use of keywords during search results. However, I try not to overuse it because it may cause 'spamming' (or being banned by search engines). 

 To select the right keywords, I usually use the google  adword keyword tool. You can find it here. Simply enter the required information and click search. Analyze the results and decide if it will be helpful for your blog.

google keyword search

Few RSS Feeds Directories

I'm not quite familiar with RSS. Just recently I’ve read something about RSS feeds and I started to explore them. I've noticed that sending RSS feeds via directories resulted to additional visitors on the site (especially my other site). So I've decided to make a list of RSS Feed directories that is useful to me. I’ll be adding more in the future. 

By the way, here is the definition of RSS according to Wikipedia. RSS or Really Simple Syndication is a family of web feed formats used to publish frequently updated works—such as blog entries, news headlines, audio, and video—in a standardized format. An RSS document (which is called a "feed", "web feed", or "channel") includes full or summarized text, plus metadata such as publishing dates and authorship.

Here are some RSS directories. (I have included some pinging sites in addition to the list I made here)


Creating the Eyes, Nose and Lips

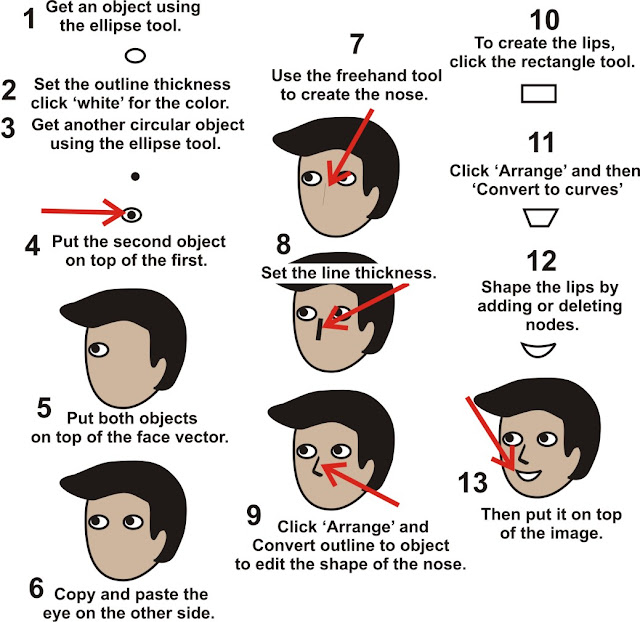
To complete the final part of the previous tutorial, here are the procedures.
(The link to the first and second parts)

make the cartoon eyes using coreldraw

1. To create the eye, get an object using the ellipse tool. 
2. Set the outline thickness and choose ‘white’ in the color palette.
3. Get another circular object using the ellipse tool. Add the desired color for the eye ball.
4. Put the second object on top of the first object for the eye.
5. Then put both objects on top of the previous image created from the previous tutorial.
6. Select both objects and click copy  located at the upper left menu bar. (See Figure 1) 
7. Paste the copied objects on the other side of the eye.
8. To create the nose, use the freehand tool on the left side (See Figure 2).
9. Drag the line from top  to bottom.
10. Determine the line thickness.
11. Click ‘Arrange’ (upper menu bar) and Convert outline to object.
12. The line is now ready for editing. Nodes can be added or deleted to shape the line.
13. To create the lips, click the rectangle tool.
14. Again determine the outline thickness.
15. Click ‘Arrange’ and then ‘Convert to curves’
16. Create the lips by adding or deleting some nodes and shaping its sides.
17. Add color  using the color palette.
18. Again, put it on top of the previous image.  
19. There you have the simple cartoon face of a man.

freehand tool of coreldraw

Creating the Hair (Creating cartoon face Part 2)

This is the second part of the previous tutorial.


Creating the hair cartoon with CorelDraw

1. Get an object using the rectangle tool located at the left menu bar.
2. Set the outline thickness (See Figure 1). My sample is set to 2 points.
3. At the upper menu bar, look for ‘Arrange’ and then click ‘Convert to Curves’
4. The object is now ready for editing or shaping. Nodes can be added or deleted once converted to curves. 
5. Put it on top of the first image created from the previous tutorial.
6. You may add more nodes to help you create the shape you desire.
7. Using the color pallette on the right side (See Figure 2), click the preferred color for the hair.
8. Make the necessary adjustment for the first image to complement with the second.
9. Remember to save your work.
9. The next tutorial will discuss the creation of the eyes, nose and mouth. 

outline and color pallette CorelDraw X3

See  the continuation here.


Creating Cartoon Face Using CorelDraw

cartoon images created using coreldraw

Above are graphic images I've created using Coreldraw X3. I’ve been using the software for several years now and I find the program easier to create vector or cartoon images. The first part of this tutorial will illustrate the method of creating the head (for my cartoon).

1. To create a simple head, click the ellipse tool (see Figure 1) located on the left  menu bar.
2. Drag the object in the working space (clipboard).
3. Using the color pallette, click the color of your choice.  
    (I used R206 G182 B158 for this example)
4. Determine the outline thickness using the outline tool. (see Figure 2 )
5. Click the object and see the upper menu,  look for ARRANGE and then click Convert  
    to curves (see Figure 3).
6. The object's nodes are now visible and ready for editing. (see figure 4)
7. By double clicking the object, you can add or delete nodes on every point or side. 
8. Use these nodes to modify the shape for the image.
9. The above tools and procedures will be applied to the other objects in order to create the eyes, nose, lips, hair.  


create a vector image face using coreldraw


See the second part of the tutorial here.

Related Posts Plugin for WordPress, Blogger...